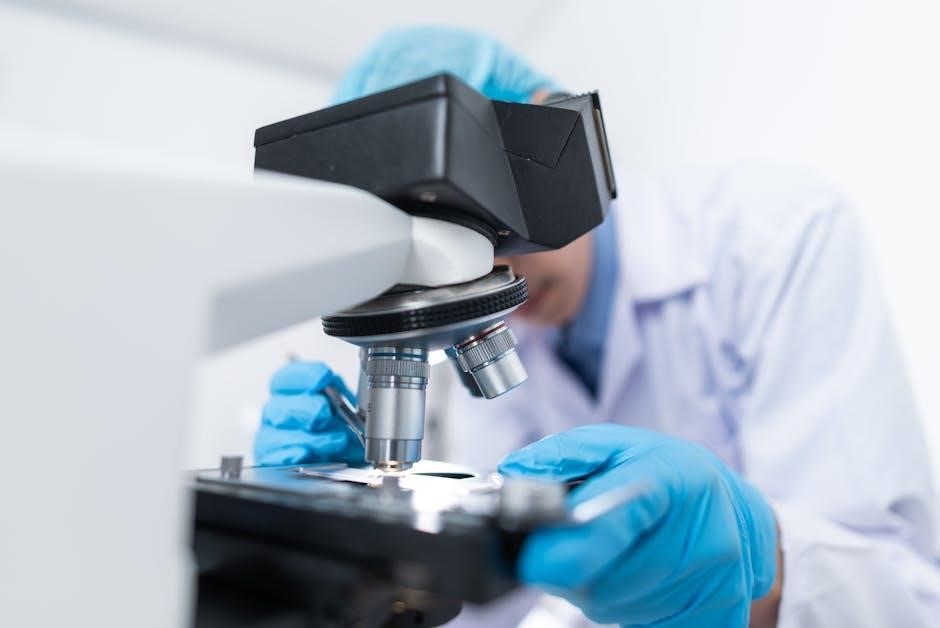
A microscope is an essential scientific tool used to magnify small objects, revealing details invisible to the naked eye․ Understanding its components, such as eyepiece, objective lenses, and stage, is crucial for effective operation and maintenance․ This guide provides a detailed overview of microscope parts and their functions, helping users optimize their experience and achieve precise observations․
Overview of the Microscope
A microscope is a scientific instrument designed to magnify small objects or specimens, allowing detailed observation of their structure․ It is widely used in biology, chemistry, and medicine to study samples at the cellular or microscopic level․ The microscope consists of a combination of lenses and light sources that work together to produce an enlarged image․ The most common type is the compound light microscope, which uses two sets of lenses: the eyepiece and the objective lens․ These lenses focus and magnify light from the specimen, creating a clear and detailed image․ The microscope also includes mechanical components like the stage, coarse and fine adjustment knobs, and a light source to illuminate the specimen․ Understanding how these parts interact is essential for proper use and maintenance․ By combining optical and mechanical systems, the microscope enables scientists and students to explore the microscopic world with precision and clarity․

Importance of Understanding Microscope Components
Understanding the components of a microscope is essential for its effective use and maintenance․ Each part plays a specific role in achieving clear and accurate observations․ Familiarity with the microscope’s structure helps prevent damage, ensuring longevity and proper functioning․ Knowing how to adjust and use components like the eyepiece, objective lenses, and focus knobs enables users to optimize image quality․ This knowledge also helps in troubleshooting common issues, such as blurry images or insufficient illumination․ Proper handling of the microscope prevents wear and tear, reducing the need for costly repairs․ Additionally, understanding the functions of components like the stage, diaphragm, and light source enhances the overall efficiency of microscopic investigations․ By mastering the microscope’s parts, users can unlock its full potential, leading to more precise and meaningful scientific discoveries․ This foundational knowledge is vital for students, researchers, and professionals relying on microscopy in their work․

Key Structural Parts of a Microscope

The microscope comprises essential structural components, including the eyepiece, objective lenses, stage, adjustment knobs, and light source․ These parts work together to support specimen observation, focus, and illumination, enabling clear and precise imaging․
Eyepiece or Ocular Lens
The eyepiece, or ocular lens, is a critical component of a microscope located at the top of the instrument․ Its primary function is to further magnify the image formed by the objective lens, enhancing the overall magnification power of the microscope․ Typically, the eyepiece provides a magnification range of 5x to 30x, depending on the model․ It is designed to be interchangeable, allowing users to customize the magnification according to their needs․ The eyepiece also plays a role in focusing the image, ensuring clarity and sharpness․ Some microscopes feature high eyepoint eyepieces, which are more comfortable for users who wear glasses․ Additionally, specialized eyepieces, such as zoom or measuring eyepieces, offer advanced functionalities like variable magnification or measurement capabilities․ Proper alignment and adjustment of the eyepiece are essential for optimal performance, making it a vital part of the microscope’s functionality․
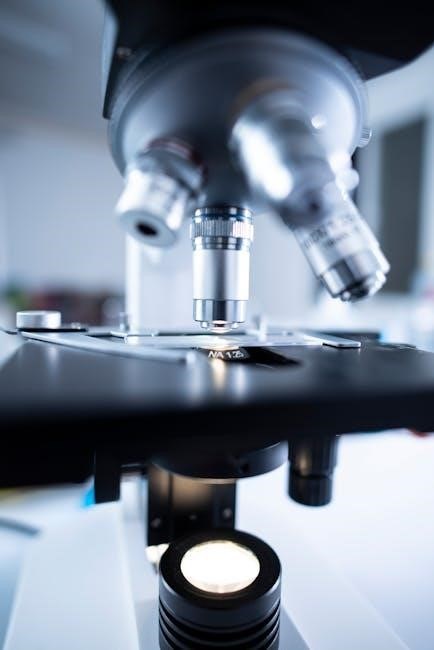
Objective Lenses
Objective lenses are a fundamental component of a microscope, located near the specimen stage․ Their primary function is to collect light from the specimen and form an image that is then magnified by the eyepiece․ Available in varying magnifications (e․g․, 4x, 10x, 40x, 100x), these lenses are selected based on the level of detail required․ The objective lens focuses the light rays, creating a real image of the specimen․ Higher magnification objectives, such as the 100x oil immersion lens, require a drop of immersion oil to enhance resolution and clarity․ Proper alignment and parfocalization of the objective lenses ensure optimal image quality․ The working distance varies with magnification, with higher power objectives having shorter focal lengths․ Understanding the role of objective lenses is essential for achieving sharp, clear images in microscopy․ Regular cleaning and maintenance of these lenses are crucial to preserve their performance and extend their lifespan․ They are interchangeable, allowing users to adapt the microscope to different observational needs․
Stage and Stage Clips
The stage is a flat platform located below the objective lenses, designed to hold and support the specimen for observation․ It is typically equipped with stage clips or clamps that securely fasten the microscope slide in place, ensuring the specimen remains stationary during viewing․ The stage often features mechanical controls that allow for precise movement of the slide, enabling users to focus on different areas of the specimen․ This adjustability is crucial for thorough examination under varying magnifications․ The stage clips are essential for maintaining the slide’s position, preventing any movement that could disrupt the view․ Proper alignment of the specimen on the stage is vital for achieving clear and accurate images․ The stage’s sturdy construction ensures stability, which is critical for maintaining focus and preventing damage to the microscope or the specimen․ Understanding the function of the stage and stage clips is fundamental for effective microscope operation and optimal specimen visualization․ Regular cleaning of the stage and clips helps maintain the microscope’s performance and longevity․
Coarse and Fine Adjustment Knobs
The coarse and fine adjustment knobs are essential mechanical components of a microscope, designed to focus the image of the specimen․ The coarse adjustment knob, typically larger in size, is used to bring the specimen into approximate focus by moving the stage up or down․ This knob allows for rapid adjustments, making it easier to locate the specimen under low magnification․ Once the specimen is roughly in focus, the fine adjustment knob is used to make precise, minute adjustments, ensuring the image is sharp and clear․ This two-step focusing mechanism prevents damage to the microscope or the slide by avoiding sudden, harsh movements․ Proper use of these knobs is crucial for achieving optimal image clarity and maintaining the integrity of the microscope․ Regular maintenance of the adjustment knobs ensures smooth operation and accurate focus control, enhancing the overall microscopy experience․ Understanding their functions is vital for effective microscope utilization․
The diaphragm and light source are critical components of a microscope, working together to regulate the amount of light that enters the instrument․ The light source, often a LED or halogen bulb, provides illumination to the specimen, ensuring that the object being viewed is well-lit․ This is particularly important for achieving clear and detailed observations․ The diaphragm, located beneath the stage, is an adjustable aperture that controls the intensity and focus of the light․ By changing the diaphragm’s opening size, users can optimize light distribution and contrast, enhancing the visibility of the specimen․ This mechanism allows for precise control over lighting conditions, which is essential for various microscopic applications․ Proper use of the diaphragm and light source ensures that the microscope operates efficiently, providing high-quality images․ Understanding their functions is vital for maximizing the potential of the microscope in different scientific and educational settings․ Effective light management is key to successful microscopy․ The base and arm provide structural support, ensuring stability and proper alignment of the microscope․ These components house and protect the optical parts, enabling precise adjustments and maintaining the instrument’s functionality and durability․ The base and arm are critical mechanical components of a microscope, providing structural support and stability․ The base is typically heavy and sturdy, preventing the microscope from tilting or moving during use․ It houses the light source and diaphragm, essential for illuminating specimens․ The arm connects the base to the microscope’s head, holding the optical components securely․ Together, the base and arm ensure proper alignment and balance, allowing smooth operation of the microscope․ Their durability and design contribute to the instrument’s longevity and reliability, making them indispensable for precise observations and experiments․ These components work in tandem to maintain focus and stability, ensuring optimal performance in various scientific and educational settings․Diaphragm and Light Source

Additional Mechanical Components
Base and Arm of the Microscope